
Installing Python and Python packages#
Do I need to install anything? You can complete Automating GIS processes without installing anything on your computer. The code of each lesson can be run interactively in the web browser.
If you want to use Python to write scripts and programmes on your own computer, you need to install Python, and possibly some of the many packages for it that provide tools for specific tasks, such as handling GIS data sets. On this page, we present one of the ways to install Python and Python packages. During this course, we will use the conda package management system, and below you will find installation instructions for different operating systems.
Install Miniconda/Conda#
Microsoft Windows#
Download the latest installation package from the Miniconda download page. Choose the latest Python version; if you don’t know, you’ll likely want the version for 64-bit Windows.
Once the download has finished, double-click the downloaded installer file to start installation. Following the instructions through the installation steps, you can use the default settings.
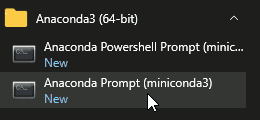
After installation has completed, start an Anaconda Prompt (miniconda3) that has been newly added to your Start Menu:
In the command shell window that opens, type the command conda --version and press Return to execute it. If installation was successful, it should print the newly installed conda version:
(base) C:\Users\user> conda --version
conda 4.12.0
MacOS#
One of the two installation methods conda offers to MacOS users is using the curl | sh (anti-)pattern. Learn more about why it can be problematic here.
Below, we describe the other officially supported method (but if you already use a package manager such as homebrew or macports, please install using that).
Download the latest installation package from the Miniconda download page. Be sure to choose the latest Python version available, and choose the pkg installer, not the download ending in bash). Choose the correct architecture for your computer (x86 or M1), see this page for how to find out.
Once the download has finished, double-click the downloaded installer file to start installation. Following the instructions through the installation steps, you can use the default settings.
After the installation has completed, open a Terminal window (it’s in Applications/Utilities), type the command conda --version and press Return to execute it. If installation was successful, it should print the newly installed conda version:
user@MacBook-Pro ~ % conda --version
conda 4.12.0
Linux#
The conda webpage instructs to install using the curl | sh (anti-)pattern. That is problematic in many ways. Whenever possible, you should install software using the distribution’s package manager that can then keep track of installed files, manage security fixes, and update software to stay consistent with the operating system. For most distributions, most software packages are available in official package repositories.
RedHat and RedHat-based distributions (e.g., Fedora, CentOS, RockyLinux)#
Use dnf or yum to install the package conda.
Arch and Arch-based distributions (e.g., Manjaro, Garuda, Endeavour)#
Use pacman to install python-conda
Debian and Debian-based distributions (e.g., Ubuntu, Mint, Pop!_OS)#
Unfortunately, at the time of this writing, there is no .deb-package of conda available, which is why you have to follow the curl | sh pattern to which the warning above relates. To improve security despite this, we recommend to:
first download the installation script from Miniconda’s download page (select the latest Python version, and the correct architecture), then
check the file against its checksum hash (printed next to the download link) using
sha256sum filename,open the file in a text editor to check the script that is about to be run, and
only then, run the installation script using
sh filename:
user@ubuntu:~# curl -LO https://repo.anaconda.com/miniconda/Miniconda3-pyXX_X.YY.Z-Linux-x86_64.sh
  % Total    % Received % Xferd  Average Speed   Time    Time     Time  Current
                                 Dload  Upload   Total   Spent    Left  Speed
100 73.0M  100 73.0M    0     0  70.3M      0  0:00:01  0:00:01 --:--:-- 70.4M

user@ubuntu:~# sha256sum Miniconda3-pyXX_X.YY.Z-Linux-x86_64.sh
78f39f9bae971ec1ae7969f0516017f2413f17796670f7040725dd83fcff5689  Miniconda3-pyXX_X.YY.Z-Linux-x86_64.sh

user@ubuntu:~# sh Miniconda3-pyXX_X.YY.Z-Linux-x86_64.sh
(#install-python-packages-using-conda)= ## Install Python packages using conda
Conda has an excellent online user guide that covers most of the basic things, such as installing new packages.
Use conda install#
You can install new packages using the `conda install <https://docs.conda.io/projects/conda/en/latest/commands/install.html>`__ command. The basic syntax for installing packages is conda install package-name. In many cases, we also want to specify the conda channel from which the package is downloaded using the parameter -c.
To installPandasfrom theconda-forgechannel, run the following command:
conda install -c conda-forge pandas
Conda will automatically install other packages that are needed as dependencies. It will also make sure that the versions of all installed packages are compatible, and update or even downgrade packages, accordingly. Read more about how packages are installed and managed in conda’s documentation.
You can install other useful packages in a similar way:
conda install -c conda-forge matplotlib
conda install -c geopandas
Note:Conda channels are remote locations where packages are stored. During this course, we download most packages from the conda-forge channel.
Hint: Conflicting packagesA good rule of thumb is to always install packages from the same channel (for this course, we prefer theconda-forgechannel).In case you encounter an error message when installing new packages, you might want to first check the versions and channels of existing packages using the
conda listcommand before trying again.
Install JupyterLab#
We use JupyterLab as a browser-based integrated development environment (IDE) during this course. JupyterLab can be installed like any other package using the conda install command. For other options and more information, take a look at the JupyterLab installation instructions.
Install JupyterLab and the JupyterLab Git extension from the conda-forge channel:
conda install -c conda-forge jupyterlab jupyterlab-git
Once the installation has completed, start JupyterLab in any directory (for instance, inside a project folder with Python files) by running the following command (notice the space!):
jupyter lab
In default configuration, this will open JupyterLab in a new browser window or tab.