Installing Python + GIS
How to start doing GIS with Python on your own computer?
First step is to install Python and necessary Python modules that are needed to perform various GIS-tasks. The purpose of this page is to help you out installing Python and various useful GIS modules into your own computer. Even though it is possible to install Python from their homepage, we highly recommend using Anaconda which is an open source distribution of the Python and R programming languages for large-scale data processing, predictive analytics, and scientific computing, that aims to simplify package management and deployment. In short, it makes life much easier when installing new tools on your Python to play with.
Install Python + GIS on Windows
Download Anaconda installer (Python 3.7 version, 64 bit) for Windows.
Install Anaconda to your computer by double clicking the installer and install it into a directory you want (needs admin rights). Install it to all users and use default settings.
Note
Note for people with a University of Helsinki computer: you need to set the installation location as C:\HYapp so that it can be used easily by anyone without the need to
pass admin credentials all the time. If you don’t have C:\HYapp -folder, create one with admin rights.
Test that the Anaconda´s package manage called conda works by opening a command prompt as a admin user
and running command conda --version.
Install GIS related packages with conda (and pip) by running the following commands in your terminal / command prompt /anaconda prompt.
As you can see below, many of the GIS packages are available from specific channel from conda called conda-forge.
We recommend that you first install only geopandas, and add the other packages once you need them. Installing geopandas will automatically install several fundamental GIS packages (such as Shapely and fiona) on your computer, so you will have a nice setup already using one installation command!
conda install geopandas -c conda-forge
Install Jupyter Lab
If you want to use Jupyter Lab on your own computer, you can install it using conda (or pip). First, have a quick look at the Jupyter Lab installation instructions: https://jupyterlab.readthedocs.io/en/stable/getting_started/installation.html
You can install Jupyter Lab using conda:
conda install -c conda-forge jupyterlab
After installation is completed, you can start a Jupyter Lab instance by running this command:
jupyter lab
Jupyter Lab should open up in a browser window.
Creating a new environment using conda
Conda allows us to create different Python environments. Python packages have often many dependencies, and some packages might, for example, only work with an older version of Python.
Run this codes in order to get started with a GIS Python environment (tested to work on Windows 10 in November 2019):
# Create a fresh environment with python 3.7
conda create -n gis python=3.7

# Activate the environment
conda activate gis

# Install jupyter lab
conda install jupyterlab -c conda-forge

# Install packages
conda install -c conda-forge geopandas
conda install -c conda-forge matplotlib
conda install -c conda-forge geojson
conda install -c conda-forge mapclassify
conda install -c conda-forge contextily
conda install -c conda-forge folium
conda install -c conda-forge mplleaflet
conda install -c conda-forge osmnx
# ... install other packages

# Start jupyter lab
jupyter lab

# Jupyter lab opens up in a browser

# Shut down jupyter lab using CTRL+C once done working
You can also install several packages in one command:
    # Install packages
conda install -c conda-forge geopandas matplotlib mapclassify
Other packages
Here are some additional packages that you might want to use at some point for doing GIS analysis in Python. Note, this list of packages might be outdated, all these packages are not necessarily used in this course.
# Install geoplot
conda install -c conda-forge geoplot

# Install pysal
conda install -c conda-forge pysal

# Install rasterio
conda install -c conda-forge rasterio

# Install rasterstats
conda install -c conda-forge rasterstats

# Install pycrs
pip install pycrs

# Install Dash using Pip
pip install dash==0.19.0  # The core dash backend
pip install dash-renderer==0.11.1  # The dash front-end
pip install dash-html-components==0.8.0  # HTML components
pip install dash-core-components==0.14.0  # Supercharged components
pip install plotly --upgrade  # Plotly graphing library
You can test that the installations have worked by running following commands in Python (try importing only those packages you installed):
import geopandas as gpd
import pysal
import cartopy
import geoplot
import osmnx
import folium
import dash
import rasterio
import osmnx
import contextily
If you don’t receive any errors, everything should be working!
Hint
It is also possible to install all these packages at once by taking advantage of .yml environment file
that is provided by us. Using them requires a few special tricks, read more from here.
Install Python + GIS on Linux / Mac
Note, download links might be outdated in this section. Check Anaconda website for latest release.
Install Anaconda 3 and add it to system path
# Download and install Anaconda
sudo wget https://repo.continuum.io/archive/Anaconda3-5.3.0-Linux-x86_64.sh
sudo bash Anaconda3-5.3.0-Linux-x86_64.sh

# Add Anaconda installation permanently to PATH variable
nano ~/.bashrc

# Add following line at the end of the file and save (EDIT ACCORDING YOUR INSTALLATION PATH)
export PATH=$PATH:/PATH_TO_ANACONDA/anaconda3/bin:/PATH_TO_ANACONDA/anaconda3/lib/python3.7/site-packages
Install Python packages
Install GIS related packages with conda (and pip) by running in command prompt following commands (in the same order as they are listed): You can start by installing geopandas, and add other packages once you start needing them. Installing geopandas will automatically install several fundamental GIS packages (such as Shapely and fiona) on your computer, so you will have a nice setup already using one installation command!
# Install Geopandas
conda install -c conda-forge geopandas

# Install geoplot
conda install -c conda-forge geoplot

# Install osmnx
conda install -c conda-forge osmnx

# Install pysal
conda install -c conda-forge pysal

# Install contextily
conda install -c conda-forge contextily

# Install rasterio
conda install -c conda-forge rasterio

# Install rasterstats
conda install -c conda-forge rasterstats

# Install pycrs
pip install pycrs

# Install Dash using Pip
pip install dash==0.19.0  # The core dash backend
pip install dash-renderer==0.11.1  # The dash front-end
pip install dash-html-components==0.8.0  # HTML components
pip install dash-core-components==0.14.0  # Supercharged components
pip install plotly --upgrade  # Plotly graphing library
How to find out which conda -command to use when installing a package?
The easiest way
The first thing to try when installing a new module X is to run in a command prompt (as admin) following command (here we try to install a hypothetical
module called X)
conda install X
or downloading from a spesific channel:
conda install X -c conda-forge
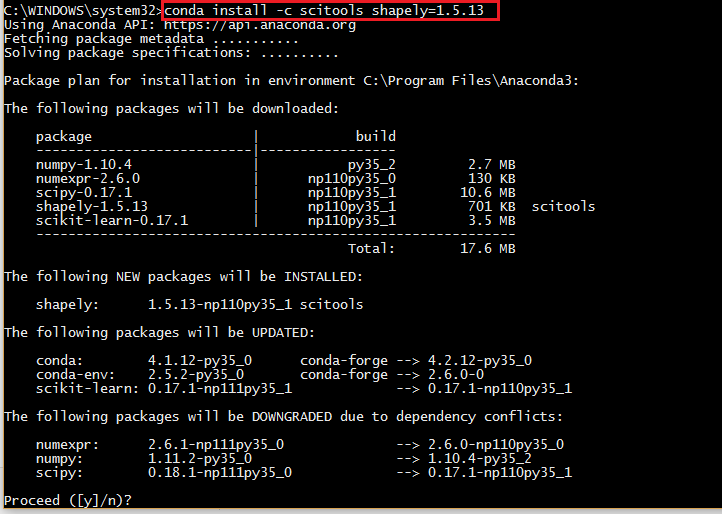
In most cases this approach works but sometimes you get errors like (example when installing a module called shapely):
C:\WINDOWS\system32>conda install shapely
Using Anaconda API: https://api.anaconda.org
Fetching package metadata .........
Solving package specifications: .
Error: Package missing in current win-64 channels:
  - shapely

You can search for packages on anaconda.org with

    anaconda search -t conda shapely
Okey, so conda couldn’t find the shapely module from the typical channel it uses for downloading the module.
Alternative way to install if typical doesn’t work
How to find a way to install a module if it cannot be installed on a typical way? Well, the answer is the same is in many other cases nowadays, Google it!
Let’s find our way to install the Shapely module by typing following query to Google:

Okey, we have different pages showing how to install Shapely using conda package manager.
Which one of them is the correct one to use?
We need to check the operating system banners and if you find a logo of the operating system of your computer, that is the one to use! Thus, in our case the first page that Google gives does not work in Windows but the second one does, as it has Windows logo on it:
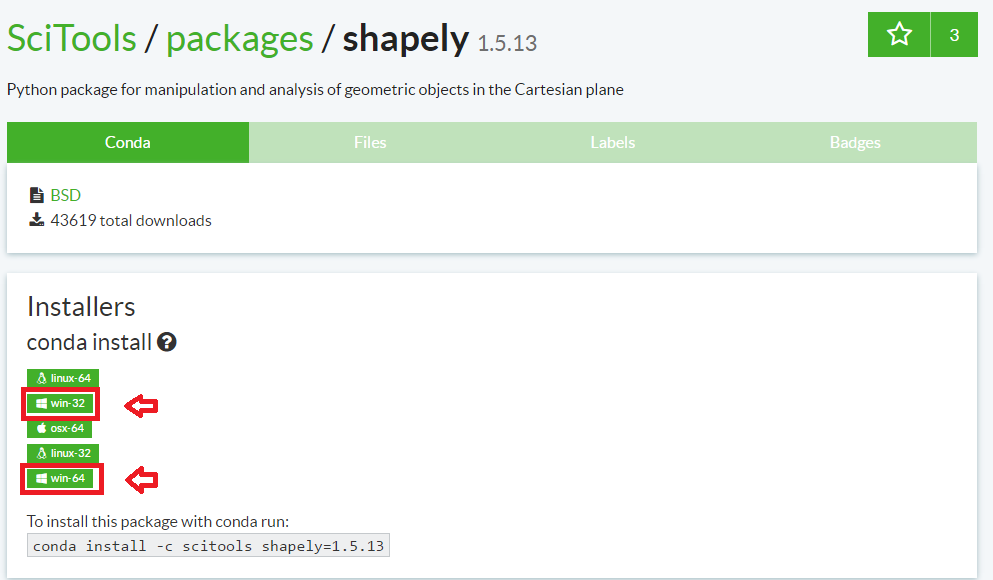
From here we can get the correct installation command for conda and it works!
You can follow these steps similarly for all of the other Python modules that you are interested to install.